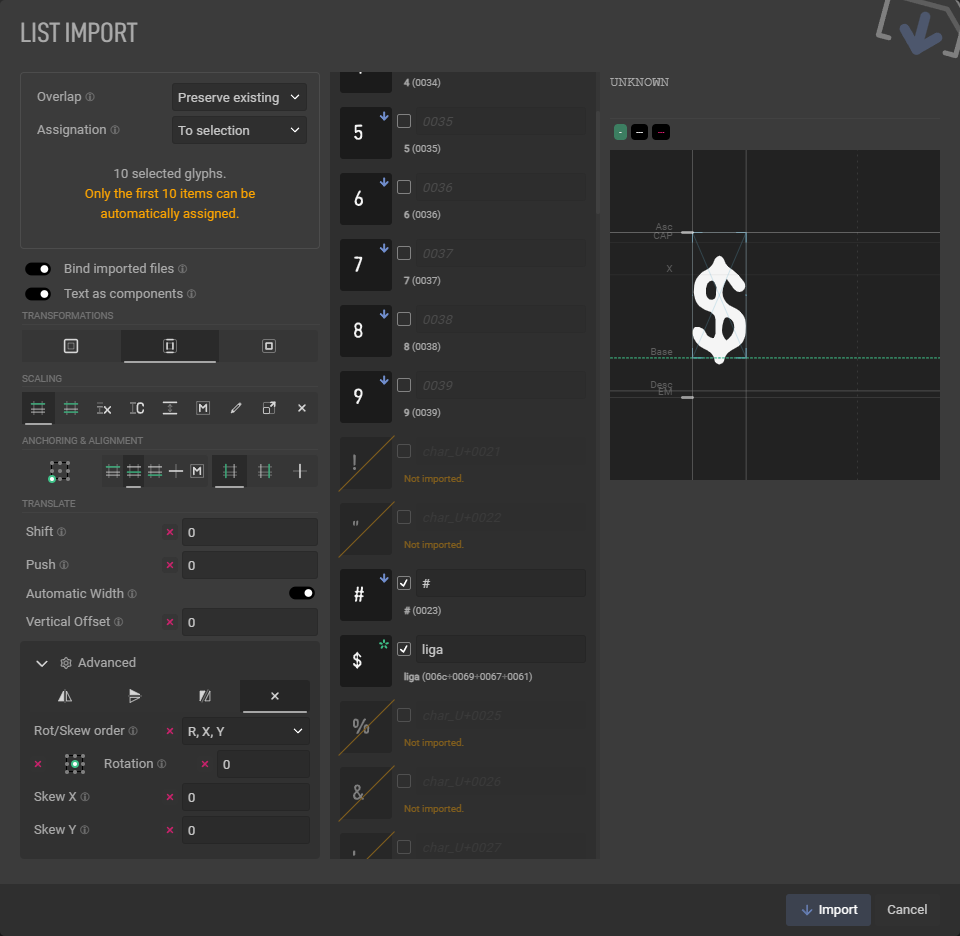
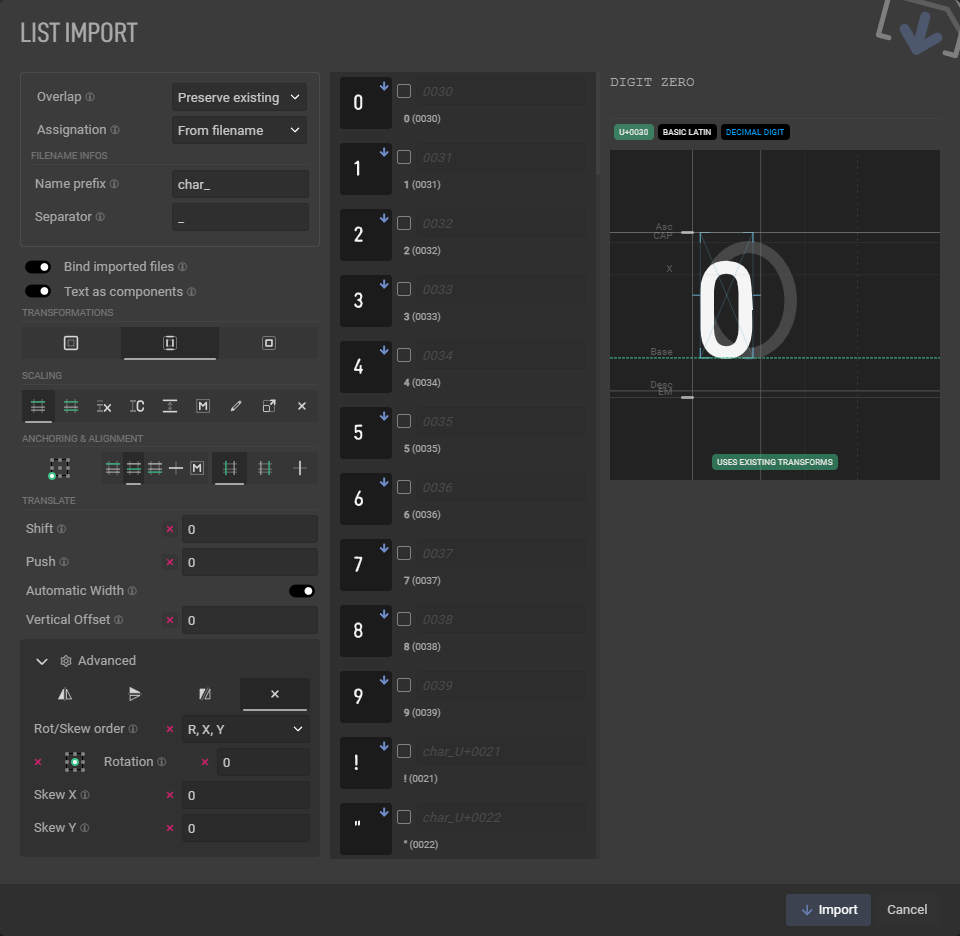
This is the dialog for importing a list of SVG files and assigning them to specific glyph slots.

Glyph Transformation
Important note : when batch-importing, the
Glyph transformations are on a one-for-all basis.
Per-glyph tweaks can be done after import.
It is also important to highlight that the preview on the right show what the glyph will look like after being imported; hence it’s very easy to check whether or not you want to keep or overwrite existing transforms. See Glyph transformations for a detailed overview of the transformation options.
Overlap
Overlap is the first setting. It manages how importation is handled when there is an overlap.
An overlap is when you’re trying to import a glyph into a slot that already contains a glyph.
The following resolutions options are available :
| Selection | Resolution |
|---|---|
| Overwrite transforms | The new path will overwrite the existing one, as well as its transformations settings, effectively using the one displayed on the left of the dialog. |
| Overwrite empty, otherwise preserve | The new path will will be overwrite the existing one, but transformations will be preserved if the path wasn’t an empty one. (useful if you manually create empty glyphs to ‘bookmark’ them) |
| Preserve existing transforms | The new path will overwrite the existing one, however the existing transformations settings will be preserved. When relying on resources-binding to work, this is a great way to restore bindings to existing glyphs and only update the graphics. |
| Don’t import | The importer will skip any item that correspond to an existing glyph. Select this is you only want to fill the slots that are currently empty in your font. |
Assignation
Assignation determines how an imported SVG will be assigned to a unicode slot. i.e, what seats it’s supposed to take.
Which option to choose from is highly specific to how you like to work, and the type of font you’re working on.
File list is internally sorted on import to ensure consistent & predictable behavior.

When working with regular font, I highly recommend using From filename and maintain strict naming conventions to avoid wondering whether a glyph should be here or there. However, when working with icon font, it can be preferable to select To block.
No matter which assignation mode you choose, you can always set the target slot manually :)
Also, the character & slot address (hex value) where the glyph will be imported is visible and updated at all times.
At the time of writing, there are four options to choose from:
From filename
As stated in the name, this option will extract the target slot from the filename structure.
By default, the importer will try to extract the largest chain of character shared by every single file. If you’re using a default prefix, it should be already set.
However, if not, or if incorrect, you’ll have to define it manually. Here are the two things required to extract info from the filename.
| Parameter | Expected content |
|---|---|
| Name prefix | A chain of character that indicates the point in the filname where MkFont should start looking for infos. If all your filenames are completely different, it’s very likely you’ll have to manually set each glyph. |
| Separator | A custom character that is used to separate the different unicode that compose your glyph. This is only useful if you work with ligatures. |
Now, there are two ways to include the slot address in the filename :
- If you’re working with simple letters that are acceptable in a filename, you can use that.
- Otherwise, you’ll need to explicitly describe the character address in the form
U+0000.
Examples
Name Prefix : char
Separator : _
| Filename | Character/Addresses found | Slot |
|---|---|---|
foo-char_A.svg | A |
A (LATIN CAPITAL LETTER A) |
bar-char_U+0041.svg | U+0041 |
A (LATIN CAPITAL LETTER A) |
poet-char_A_U+0041.svg |
A, U+0041
|
AA (custom ligature) |
char_U+0041_U+0041.svg |
U+0041, U+0041
|
AA (custom ligature) |
nay-char_0.svg | 0 |
0 (DIGIT ZERO) |
nay-char_test.svg |
t, e, s, t
|
test (custom ligature) |
…And so on. Everything before char will be ignored, and everything after is extracted at each ‘_’
The
U+0000can be added to your clipboard from multiple places in the app. Look for.
To block
This option will start importing glyphs into a specific Unicode block of your choosing (from the Reference block list).
You can then select where to start importing within that block :
| Selection | Behavior |
|---|---|
| Block start | The import will start at the first index of the selected block. |
| First empty slot | The import will look for the first empty slot within the selected block, and start import from there. |
| Manual offset | not implemented yet |
Now, if you import a massive number of glyphs, or simply if you selected first empty slot and there isn’t any, glyphs will still be imported but they will overflow to the next block.
If that’s something you want to avoid, have a look at the next option.
To block (constrained)
Identical to To block, this mode won’t import glyphs that would fall outside of the selected block’s range.
To selection
This is the tricksiest of the gang, probably the less useful too. It requires an active selection within the viewport prior to importation. This selection will be used as target default slot in the order in which the selection has been made.
Import list
The import list lets you browse to the file that are going to be imported and check out their state.
Each item offer the ability for manual assignation.
| State | Meaning |
|---|---|
| New glyph |
 Glyph will be imported in the U+0048 slot, a.k.a Glyph will be imported in the U+0048 slot, a.k.a F, a.k.a LATIN CAPITAL LETTER K
|
| Overwrite glyph |
 Glyph will be imported in the U+003F slot, a.k.a Glyph will be imported in the U+003F slot, a.k.a ?, a.k.a QUESTION MARK
|
| Overwrite custom glyph |
 Glyph will be imported in the U+0041 slot, a.k.a Glyph will be imported in the U+0041 slot, a.k.a A, a.k.a LATIN CAPITAL LETTER A
|
| Not imported |
 Glyph will not be imported. Glyph will not be imported.
|
Manually assign a slot
What to input in the field to get what you want is very similar to the way assignation by filename works : content of the field will be parsed to find the slot that matches your input.
The main difference is that here, each character is looked at. If you input more than one character, it automatically becomes a ligature; unless you’re using the U+0000 format.
No matter what happens, the item will preview the final destination slot right below the input field.
Examples
| Input | Character/Addresses found | Slot |
|---|---|---|
A | A |
A (LATIN CAPITAL LETTER A) |
U+0041 | U+0041 |
A (LATIN CAPITAL LETTER A) |
AU+0041 |
A, U+0041
|
AA (custom ligature) |
U+0041U+0041 |
U+0041, U+0041
|
AA (custom ligature) |
0 | 0 |
0 (DIGIT ZERO) |
test |
t, e, s, t
|
test (custom ligature) |
…And so on.
When overwriting an existing glyph, preview will show a faint version of the currently existing glyph behind the new one, so you get a better sense of the update you’re about to apply.
